
or
Cosplay make up tutorial!!! *woot woot!*
THIS TUTORIAL IS ONLY FOR ALMOST PERFECT SKIN
Yay! Finally got around to making this. In celebration of my birth month and as thanks to all those who support my cosplays, I have finally decided to get this make up tutorial for cosplay out.
Let's just say am really happy that there are people who appreciate my work, seriously, thank you very much for the support and appreciation^^
Also, this is my way of giving back, trying to help the community, if we want to improve, let's help each other out. =)
My make up technique is a product of experience and a combination of what I have learned from friends and watching tuts on the net. There's stuff I learned from trials, from Zhel, some bits from Kaname and Sushi Monster, some from Kyo and some from Sese. I am in no way an expert in anything, there is no perfect way but there are a multitude of ways one can achieve the desired result, it's just a matter of finding the one that most suits you.

Here are some things that one should keep in mind:
- This tutorial is for achieving nice and almost perfect skin, this is what I developed and use as of late for my cosplays.
- For cosplay, best not go with too much color unless the character requires it. Smooth and nice skin + well defined eyes are your main priority, this applies to most characters.
- 2D characters are made to look perfect in almost every way, they do not exist in the real world. We can try to imitate them as best as we can but we must also learn to accept that we can't be a perfect replica of said characters.
Alright!
Before putting on make up, I have some pre-make up rituals and tips I'd like to share with you guys.
YUU'S PRE-MAKE UP TIPS AND RITUALS:
- *Sleep. Yes, do your best to get rest before you put make up, contact lens or cosplay. Even if you cram, still try to get some well deserved rest, we are human beings, we need sleep to function well. Also, sleep deprivation causes your immunity to weaken -it would be a shame if you get sick and not be able to wear the costume you worked so hard on, causes you to break out - no one likes acne >_<, causes eyebags - so hard to get rid of!, and it causes you to be irritable.
- *Fix your eyebrows, shape 'em, trim, wax, thread, shave, pluck or whatever, just get them to be neat and tidy ! It's easier to draw them on later. I trim and shape my eyebrows on a regular basis as I am very involved in a lot of cosplay activities and I just like that my brows look neat. Here's a tut on how to get manage your brows: How to trim eyebrows
- *Wash your face or better yet, take a bath. I think the famous Filipino saying "lamang lang ng paligo" holds so much truth. When you do take a bath, you smell nicer, you are cleaner, you are fresh and it makes you more presentable. I usually take a long bath, the day or night before I cosplay, I exfoliate, moisturize and all that shizz.
- *Brush yer teeth. No one likes a bad breath... and you don't want to have something stuck between you teeth in the photos...
- *I have bad eye sight and am highly dependent on my glasses, so I put my contact lenses right after I take bath and before make up so I can see what I am doing. Zhel on the other hand puts her lenses after her make up and nothing is ruined! How do you do that, woman?!
- *I wear most parts of my costume at home so I can change easily when I get to the venue. I wear parts that go over my head or are tight at home and before make up coz I dont want le make up to wipe off on the clothes when I change.
- *When doing make up, it's bet to sweep you hair away from your face as hair can be bothersome.

Stare in the face of no make-up!
Yes, honestly I only look nice with make up. I have permanent lines under my eyes and I am easily prone to redness... My eyes are small and I have lots of moles on my face >_< Don't get me wrong, I love me, I just want you to really appreciate the before and after. hhehehehe

Just sharing.
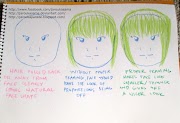
Lenses can greatly affect a cosplay, see how my eyes have magically grown larger? See the difference?
The larger the diameter, the moe-er you look.
Now on to the prettifying!
1. Ice

I grab an ice cube from the fridge and hold it around my face till it completely melts.
It's cold so I hold it with a towel, the towel also is to soak up the drips as I don't want to clean up any mess.


Go around your face and neck and all the parts that will have make up on it, the cold closes your pores or something like that, I saw this on TV hahah
Stop until there is no more ice of cube left. If you didn't sleep, another ice cube should help.
Pat off the water, let the cold sit for about 5 minutes.
2. Moisturizer and lip balm
Some day we will be old and wrinkly, everybody ages but I don't want to have wrinkles early in life so if you don't either, take care of your skin!
Moisturize! I use this one by Myra. Not only is it cheap @ around 80PhP, it lasts long and it does the stuff for me. Don't put too much though as too much will make you oily.

Put lip balm on coz chapped lips aint pretty.

I put lip balm on to protect my lips plus I like the cool soothing feel it gives.
I let it sit again for 5 minutes or until the moisturizer dries off completely.

With lenses on both eyes and not yet dry moisturizer.
Face looks oily but it will get absorbed by your skin.
3. Make up primer / base
Conventions and events are crowded and it is generally hot in the Philippines as this is a tropical country, to make your make up last longer and make it "stick better", I'd recommend to use the a make up primer.

By flower Primer from Nature Republic @ 300Php

Slowly getting better skin, not as much red spots, too.


When applying cream based products, I put a small amount on the back of my hand first then I use a foundation brush to spread em.

This one is from E.L.F., found in SM Department store @ around 150PhP

4. BB cream
What is a BB cream? Well, BB stands for Blemish Balm or Blemish Base.
It was initially used by dermatologists to help laser surgery patients protect, soothe and refine highly sensitive skin while providing light coverage for post-laser scars, acne and other blemishes. Additionally, BB cream encourages skin regeneration and helps to maintain youthful skin. --->got this off wikipedia. LOL
So, as its name implies, it makes skin all smooth and prettiful.
The one I use currently is from Nature Republic, by flower BB cream which is about 300php


A face with BB cream, skin has evened out somehow.
5. Baby powder
Yep, to help the previous layers set.
Any brand will do. I prefer baby powder over le final powder coz baby powder is:
- *way way waaaaaaaay cheaper
- *it's white which makes me look fairer
- *it smells nice

You'd need a sponge though, to dab the powder on. Dab and pat ONLY. A dry sponge please, not wet as you want the other layers to dry, the powder will help set them layers.

You can use final powder, Nichido has different shades perfect for different skin tones, using baby powder will make you paler/ lighter though.
I use baby powder mostly when I want to be lighter and flesh toned ones if I want to be darker, it just depends on what skin color you want to imitate.
6. Foundation
This is my favorite =)
Etude House's BB Magic Balm.
It is a cream based, foundation infused with BB cream and it really is like magic because it has extreme coverage and makes your skin smooth looking. I heard that this particular item is no longer available in EH stores anymore though...

Now, since this is my last layer of cream based products, I am now concerned about brush mark and proper setting. Right after the actual foundation, I then dab baby powder all over the parts with make up to help em set nicely.
If anything is still red and needs concealing, I cover them with concealer at this stage.
This are the the concealers I have on my kit.
The cheapest is my favorite as it really matches my actual skin tone, Japanese brand concealer form Saizen @ 85php.
E.L.F. Concealer palette @ 250php, has 2 shades of concealer, 1 green for correcting redness and lilac for highlighting, also comes with a mirror inside.
The body shop concealer was on sale for 850php, also awesome but is a shade lighter than my actual skin tone.

To be honest, I rarely need to use concealers anymore with the items I use and the layers I have on. heheheh
Anyway, after the concealer, I suggest that you go over your face and dab away with more baby powder.

Because of the baby powder, I look kinda pale but hey, look at mah nice skin! hhahaha
barely no lines and blemish!
7. Pressed / loose powder
Last step in getting the awesome skin!
The pressed powder!

I has a few in varying shades, I choose which one to use depending on the character I am about to cosplay

Mainly, this is to get the right shade of skin, evening out the previous layers and making sure that there are no more brush marks.
Also these compact powder / foundations are handy for touch up and checking if your face, invest on a good one. I prefer 2-way pacts mostly though has they have very nice coverage and are powders when dry and foundations when wet.
And then your done! For the skin at least hehehe
A few more notes:
And then your done! For the skin at least hehehe
A few more notes:
- *When applying make up, start with your nose then spread outwards. What I do is I finish my nose first, then extend towards the forehead, nose to eyelids, nose to under my eyes and so on.
- *Apply make on ears and neck (I go over my eyebrows, lips and ears) as well. You don't want to have a "mask" on. If your chest, shoulders and back will be exposed, go over those parts too. Put make up on all parts that will be exposed that way you'd have an even and believable skin tone.
- *I put make up on my lips, too. I think it makes me look more anime-ish. XD Plus, making my lips lighter in color make colored lip stick pop even more. A lip concealer is also available in Etude House for about 300PhP.
- *Be gentle with your face, dab and pat ONLY.
- *Let every layer set/ dry properly, give it time, 1 to 5 minutes tops.
Peoples' facial features vary, do not expect to find one tutorial that is perfectly suited to your face and needs. Gather tuts, try them out, and get the bits that work for you.
Experiment and learn.
This tutorial is for almost perfect and blemish free skin only, I may make another one for eyes and the rest but I am too lazy as of the moment. This is not the only way to get nice skin thru make up, but this is what works for me, I am not a make up master but this is what I do and I find it effective. I am sharing this in hopes that it may help one out.
Apologies for the photos, on my 1st attempt to make a tut, I got tired and decided to not continue, hence the difference in light and a few other stuff XD
The items mentioned in this tut are what I use, I have not gotten any negative skin reaction from them, it is completely up to you if you wish to use them as well.
When buying make up, I highly suggest that you try them on your face and not on the back of your hands as not everyone has an even skin tone, you can try on you chin. You'd get a more accurate shade and better results if you test the item out before buying. Stay away from cheapo make up and check the expiration date.
Thanks so much and happy cosplaying!~
*******************************
thanks for reading!
jaa! visit me again, ne!
arigatou! (*^3^)/~
FACEBOOK PAGE : http://www.facebook.com/jaroukasama
WORLD COSPLAY : http://worldcosplay.net/member/jaroukasama/
INSTAGRAM : https://www.instagram.com/jaroukasama/
DEVIANT ART : http://jaroukasama.deviantart.com/
TWITTER : http://twitter.com/jaroukasama
WORLD COSPLAY : http://worldcosplay.net/member/jaroukasama/
INSTAGRAM : https://www.instagram.com/jaroukasama/
DEVIANT ART : http://jaroukasama.deviantart.com/
TWITTER : http://twitter.com/jaroukasama


11 Comments
Nice tutorial Yuu! The ice works! Closes pores. Yay! :)
ReplyDelete~Chai
http://chenmeicai.blogspot.com
Uwaaaaaaa~
ReplyDeleteFINALLY! ^^
I'm looking for a cool cosplay make-up tutorial for ages! =))
THANKS A LOT! :D
really help ate yuu :D thanks for this tutorial~!
ReplyDeleteThanks for this post! I'm actually surprised when I asked you what's your makeup technique when you cosplayed Saber, and you answered immediately! Thanks for this post!
ReplyDeleteI just have a question. Do you use a wet sponge on baby powder? Thanks!
;A; I weep that the Magic BB Balm is not available anymore huhu, just when mine is running out...
ReplyDeletenice tuts ate yuu ~ very helpful :3
ReplyDeleteI love you! I've been looking for a make up tutorial like this! It's simple and easy to understand especially for a make up noob such as myself. The pictures and the descriptions of the items as well as their purposes HELPED A LOT. THANK YOU!!
ReplyDeletethanks for the tutorial :D
ReplyDeleteNow I can use that for my cosplays too xD
GAH. Finally. a decent post on how to get smooth skin. As a cosplayer, it's actually hard to get that smooth skin -.-" This really helped! Thanks a bunch! Keep up the awesome cosplays and tutorials!! Im a big fan! ^__^
ReplyDeletevisit my blog sometime!
http://itspatriciaaa.blogspot.com/
moisturizers are really good. i don't use them before but it really has a great effect. the only thing i don't do before cosplay is shaving my eyebrows. i haven't trim them since birth and i never will. I set my eyebrows while putting moisturizer then apply concealer after ^^
ReplyDeleteYou look cute
ReplyDelete