

First off, I apologize...
I have been feeling unmotivated in keeping up this blog because it feels so cluttered...
My dear readers and followers, DO NOT FRET! I am already working on reorganizing and giving my blog a new look that will hopefully make it easier for you guys and make me more enthusiastic in writing again! ;D
YOSHAAAAA!
Today let's talk about WORKING WITH PAPER CLAY.
This is also my first time to work with said material and I highly enjoyed the outcome.
Paper clay is really easy to work with and is ideal for cosplay because:
1. It is cheap and easily found. It can be bought in bookstores, craft stores and in DIY Centers.
In the Philippines I believe National Bookstores have them, I think they carry Sakura brand paper clay.
If you are in Japan, you can find them in home centers like Kahma 21 or Tokyu Hands.
If you are unsure, ask for "kami nendo" or 紙粘土.
2. It is forgiving and you don't need any special tools to make stuff with it.
Maybe you do hahahahah
Proper tools do make the job easier but even with just some sharp sticks, a pencil and water, you can make something nice.
You don't have to be very artistically inclined either as mistakes can be easily remedied.
3. Air dry, strong and light weight.
Perfect for making accessories and little details.
When you are happy with your work, just leave it to dry, paint and voila!
I got asked to make a belt buckle for Kotobukiya's Shoujo series : Edward Scissorhands.

If you look closely, the buckle on her waist; the biggest one, is unlike the rest of the costume.
It looks like a waning crescent moon with a face.
As I said, I had no previous experience working with paper clay.
The only thing I know about is was that my friend, Aruki, used to post her WIP pics with paper clay.
I know, this seems like a repeat of my Xing Cai insulation foam sword. hahahha
But what better way to learn than with your hands?
I had planned to used worbla for this originally, but as I was getting ready, I found my supply low and I dug out my paper clay which I bought years ago (because it was on sale) still unused.
Preparation:
Apologies in advance, I had not meant to make a blog about this so I didn't think to take pictures every step of the way. But it turned out better than expected and I thought I'd share the wonders of this material with y'all.

Tanoshii Paper Clay I bought from Kahma 21
After gathering my references pics and making plans for the buckle, I covered my table with plastic as I knew working with water would make a mess.
I also had a rag, tissues and a big plastic cup of water to dip the paper clay into.
Pencils and something sharp, in this case I used an old screw driver and a pointed barbeque stick hahahah.
Have a clean paint brush and sand paper nearby, too.
The center of the buckle (the bar and the prong) is made from left over bits of worbla (I swear worbla is worth every bit of it, no waste at all! :D Everything can be used). The frame is made from a sturdy plastic sheet I got from Daiso. I cut it in the shape and size that I wanted the end product to be.
Below is an illustration of what a basic belt buckle consists of.

Working with Paper Clay:
No photo of the plastic base but I covered it with paper clay to make the frame and stuck the worbla made bar and prong in the middle.
Upon opening the bag of paper clay, you will find it to be dry and hard. You have to wet your hands a bit to be able to tear small chunks from it.
The pink thing in the corner was part of the plastic circle base I was talking about.
I didn't use any adhesive to stick the paper clay to the base. When the paper clay is wet, it can be very gloopy and somewhat sticky so best to work on a smooth, plastic covered surface.
In the photo below, I just stuck the paperclay at random so it looks very clumpy.
In the photo below, I just stuck the paperclay at random so it looks very clumpy.

Added more details to form the basic shape I am going for.
Just grab a bit of paper clay, dip it slightly in water and stick it on to the other paperclay parts. once it dries, it will adhere properly.

I got up and watched a movie, about 3 hours later I came back to a dry clumpy buckle like thing.
With sandpaper I sanded the buckle to a more desirable shape.
To fully smoothen the buckle, I would go over it with a moist fine brush.
MOIST! NOT DRIPPING WET!
This is just to get rid of any sanding marks left behind.
Sorry, no pictures.
Just continue sanding and going over with your moist brush.
Remember to let it dry before sanding again.
10-15 minutes will be enough.
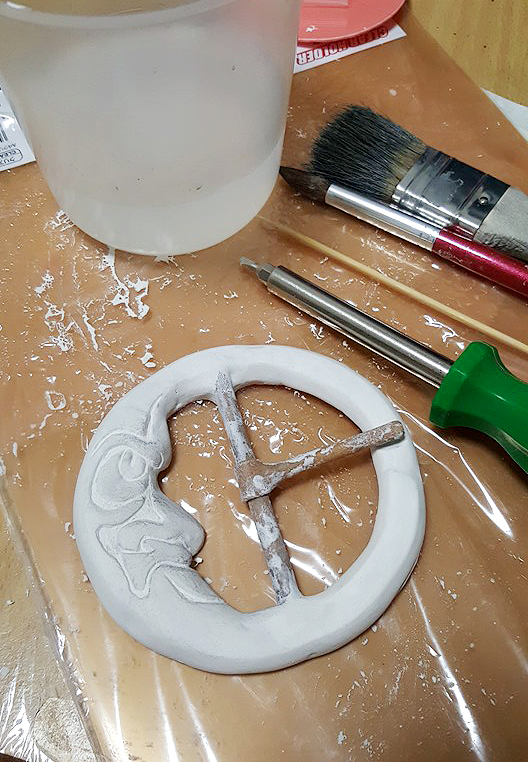
Once I was happy with the smooth buckle, I drew guidelines of the design I was going to carve with a pencil.

I didn't have any proper carving tools so I used what was around the house.
Found an old screw driver and some barbeque sticks. hehehehhe They worked just fine.
Carving is a tedious job that shouldn't be rushed. Work slowly, bit by bit.
In the pic, you can see a bigger and wider brush that I normally use for my dry brushing projects.
Here, I used the big brush to sweep away the dust as I carved out the design.
You will notice that carving the details will leave some rough marks.
Dust off the excess particles and go over it with your moist fine brush and when it dries, it will be smooth again.
Ain't paper clay awesome? :D
More details!
Carve, dust, go over with moist brush, wait to dry, repeat until you are satisfied.

I didn't think of priming the paper clay before painting.
Will experiment and let you know if there is any significant difference to priming and not priming.
In the pic below, I painted the buckle with black acrylic spray paint.

Once dry, I painted it with gold using the dry brush technique, to give it an old and worn look.

2 layers of gold. I thought it looked great already.

2 layers of gold didn't seem to make it pop against black so I went for another layer.

Once I was happy, I sealed the paint with clear spray paint.
Here is my finished belt buckle for Edward Scissorhands ;D
You can even see my Rilakkuma slipper peeking in the corner hahahaha

The finished belt buckle as seen in my DA gallery

Working with paper clay was definitely fun!
And easy!
I highly recommend this material for any cosplayer looking to make their own crafts. :D
*******************************
thanks for reading!
jaa! visit me again, ne!
arigatou! (*^3^)/~
FACEBOOK PAGE : http://www.facebook.com/jaroukasama
WORLD COSPLAY : http://worldcosplay.net/member/jaroukasama/
INSTAGRAM : https://www.instagram.com/jaroukasama/
DEVIANT ART : http://jaroukasama.deviantart.com/
TWITTER : http://twitter.com/jaroukasama
WORLD COSPLAY : http://worldcosplay.net/member/jaroukasama/
INSTAGRAM : https://www.instagram.com/jaroukasama/
DEVIANT ART : http://jaroukasama.deviantart.com/
TWITTER : http://twitter.com/jaroukasama


0 Comments